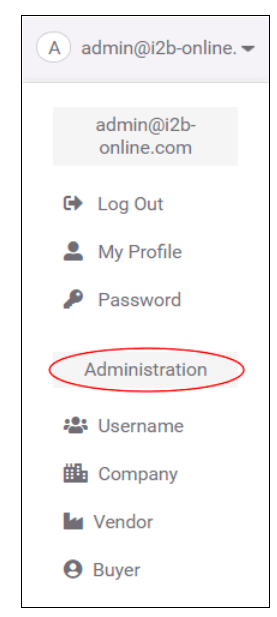
 Accessing the vendor area
To update vendor email addresses:
- Click on your username in the top-right corner of the screen.
- Select ADMINISTRATOR from the menu, then choose VENDOR. If you don’t see the ADMINISTRATOR option, you are not a system administrator.
Assigning email address to Vendor
In the VENDOR section:
- Add or edit email addresses as needed.
- Click UPDATE at the top of the page to save changes.
Important:
- Each vendor can have up to 5 main email addresses for alerts.
- If more than 5 recipients are needed, we recommend using a group email address managed by the vendor.
- Order Alerts: Main email for new or changed orders (plus up to 4 additional addresses).
- Overdue Reports: Weekly reports sent here; defaults to main email if blank.
- Delivery Schedules: Alternative email for delivery schedules; defaults to main email if blank.
- Purchase Contracts: Alternative email for contracts; defaults to main email if blank.
- Invoices: Invoice-related information sent here.
- Open Order Reports: Sent if enabled in the vendor’s profile.
- Reject Information: Sent if your company shares reject details.
- Quotation Requests: Sent here; defaults to main email if blank.
- Service Entry Sheets (SES): Sent here if enabled; defaults to main email if blank.
- Order Date Restriction: Enter a number to limit PO list to orders within that many days.
Should a vendor no longer wish to receive email alerts
If a vendor no longer wants email alerts:
- Remove all email addresses from their account.
- Click UPDATE to confirm.
Warning:
- Vendors will not receive automatic notifications.
- Buyers will need to manually inform vendors of changes.
- This increases workload and risk of missed updates.
Lite vendors - all the functionality of a full vendor without the need to log in
Lite vendors have full functionality without logging in:
- They receive alerts and can action orders via a link in the email.
- Actions are tracked in i2B and reflected in M3 automatically.
To set up a Lite vendor:
- Add an email address in the VENDOR section.
- Do not create a login profile in the USERNAME section.
ERP Integration Option
If your vendor prefers to have order information automatically sent to their ERP system, we can provide this as an option.
There are several integration methods available, which can be tailored to meet the vendor’s specific requirements.
To explore these options, please contact supportdesk@i2b-online.com.
How to create a Vendor User:
https://i2b.zendesk.com/hc/en-us/articles/42843410690321-Creating-a-user-Vendor
How to create a Buyer User:
https://i2b.zendesk.com/hc/en-us/articles/42864207215377-Creating-a-user-Buyer
How to create a Requisitioner User:
https://i2b.zendesk.com/hc/en-us/articles/42864898244881-Creating-a-User-Requisitioner
0 Comments